
10 Grammarly Keyboard Shortcuts That Save Hours of Editing
By SM Mehedi Hasan
The most time-saving Grammarly keyboard shortcuts in 2026 include Shift+Ctrl+Alt+G to open the assistant on Windows, Tab to navigate between elements, Enter to accept suggestions, Esc to dismiss and close, and \ (backslash) to trigger Grammarly Snippets instantly anywhere you type.
Most Grammarly users spend hours every week doing something that takes seconds with shortcuts.
They reach for the mouse, click the floating widget, click the suggestion, click dismiss, and move to the next one. Repeat fifty times per document. That adds up fast.
If you’re editing anything longer than a single paragraph, knowing which shortcuts actually work and when to use them cuts your review time significantly.
This guide covers the ten most practical ones, explains the contexts in which each matters most, and points out a few things competing guides get wrong or simply skip.
Table Of Contents
Quick Reference: All 10 Shortcuts at a Glance
| Tool | Database | Detection Rate | Paraphrase Detection | Best For |
|---|---|---|---|---|
| Grammarly Pro | 16B web pages + ProQuest | 54-86% | Weak | Blog/content writers, draft checks |
| Scribbr (Turnitin-powered) | 91B web pages + 69M publications | 88% | Strong | Dissertations, thesis, research papers |
| Turnitin | Academic papers + student repo | 96% | Strong | Institutional academic submissions |
| Quetext | Large web + contextual matching | Good | Strong (DeepSearch) | Paraphrase-heavy content, essays |
| Copyscape | Web only | 89% (web) | Limited | Web content, blog posts, scraping detection |
| Copyleaks | Web + AI detection | Good | Moderate | AI-assisted writing detection |
In My Experience
What Actually Changed When I Switched to Keyboard-First Editing
After using this for a week with full keyboard navigation, the biggest shift wasn’t speed. It was a focus.
When you stay on the keyboard, you don’t lose your place in the document the way you do when you move to the mouse, click a suggestion, and then try to find where you were reading.
The Tab-Enter-Tab rhythm keeps your eyes on the text. The thing that surprised me most was the snippet shortcut. I had the Snippets feature for months, but never used it because the documentation made it sound complicated.
Then I noticed the \ trigger mentioned in a Grammarly support article about IT team workflows, tried it in Gmail, and it just worked. No setup beyond creating the snippet itself. One keystroke, select from the list, press Enter. Done.
I ran into an issue when trying to use F6 navigation in the Grammarly Editor on Firefox. It behaved inconsistently compared to Chrome, sometimes highlighting the wrong element first or skipping the suggestions panel entirely.
If you’re a Firefox user and F6 isn’t working as described, switching to Chrome for Grammarly Editor sessions is a practical workaround until that inconsistency is resolved.
One limitation that frustrated me: there’s no shortcut to jump directly to the next underlined error in the document itself, the way Ctrl+; does in Microsoft Word for tracked changes.
In Grammarly, you still have to open the assistant first, then use Tab to navigate the suggestions.
A “jump to next error” shortcut that works without opening the panel first would be genuinely useful, and it’s a gap that competitors haven’t fully addressed either.
How Grammarly Keyboard Shortcuts Work in 2026
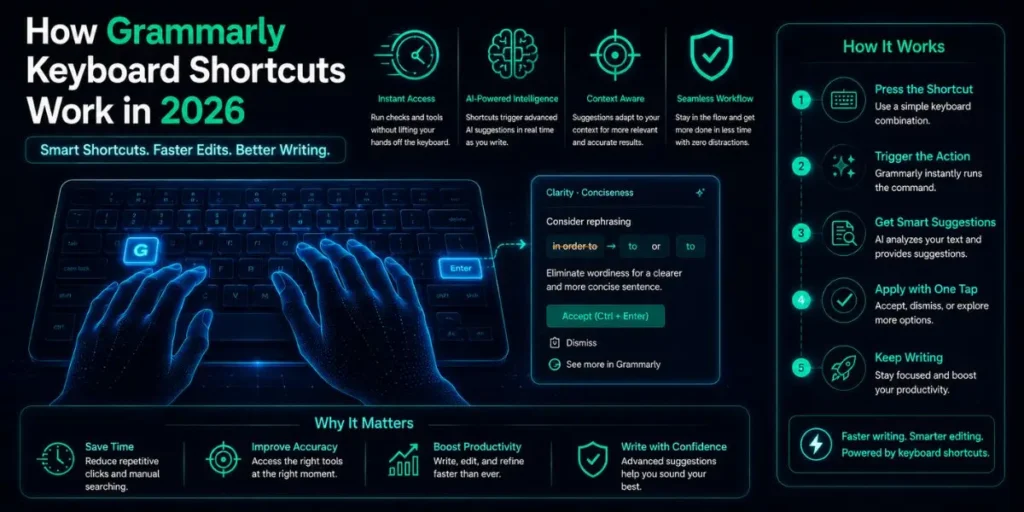
Before jumping into the list, one clarification most articles miss entirely. Grammarly’s keyboard shortcuts are split into two groups that work differently depending on where you’re writing.
The browser extension (Chrome, Edge, Firefox) has its own shortcut set. The desktop app for Windows and Mac has a slightly different set of options.
And the Grammarly Editor (the web app at app.grammarly.com) works like a standard rich-text editor, with its own formatting shortcuts.
Knowing which environment you’re in matters because a shortcut that opens the assistant in the browser extension does nothing inside the desktop app, and vice versa. This guide covers all three clearly.
2026 Update
Grammarly is now part of Superhuman after the parent company rebranded in October 2025.
The shortcuts themselves haven’t changed, but if you’re using a Superhuman suite subscription, keyboard access to the Grammarly assistant works the same as always through the standard extension and desktop app interfaces.
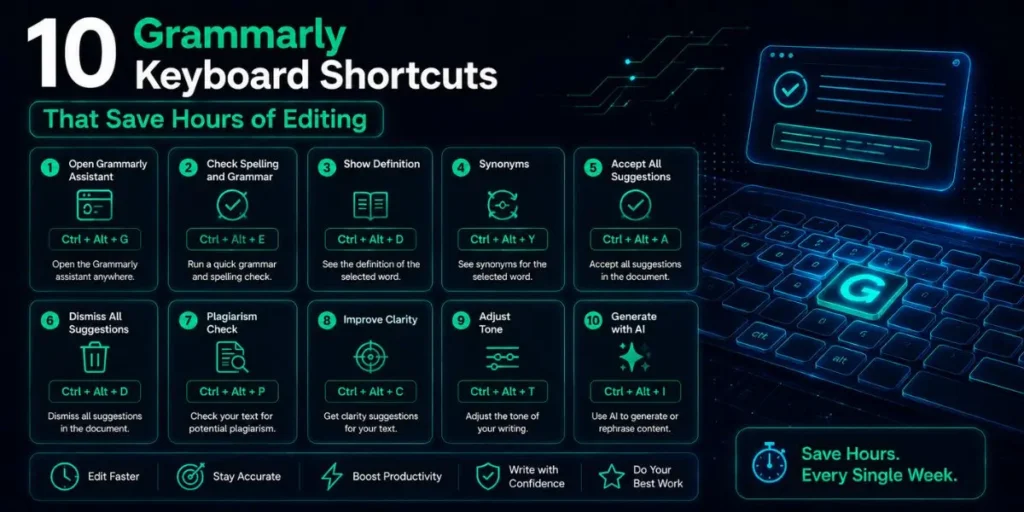
The 10 Grammarly Keyboard Shortcuts That Actually Save Time
1. Open the Grammarly Assistant (Browser Extension)
- Windows: Shift+Ctrl+Alt+G
- Mac: Shift+Ctrl+Cmd+G
This one shortcut replaces the most time-consuming click in Grammarly’s workflow.
Instead of moving your hand to the mouse, finding the floating green icon at the corner of a text box, and clicking it, you press this combination, and the assistant panel opens immediately, right where your cursor is.
Most people write in Gmail, Google Docs, or a CMS and constantly switch between keyboard and mouse to check suggestions. This shortcut eliminates that switch entirely.
Keep your hands on the keyboard throughout a full editing pass. You can also change this default combination in Grammarly’s settings if the four-key combo doesn’t suit you.
Go to your Grammarly account settings, look for the keyboard shortcut configuration section, and assign a simpler combination that doesn’t conflict with your browser or OS shortcuts.
2. Open the Grammarly Assistant (Desktop App for Windows)
- Windows: Shift+Ctrl+G
- Mac (AI Chat): Ctrl+G
This is the desktop app version of shortcut #1. When you’re writing in Microsoft Word, Outlook, Slack, or any desktop application, the browser extension shortcut does nothing.
The desktop app uses a different combination: Shift+Ctrl+G on Windows, which opens the Grammarly assistant within whatever app you’re currently in.
On Mac, if you have the AI Chat feature enabled, Ctrl+G opens the assistant with AI Chat mode active.
The full combination Shift+Ctrl+Cmd+G opens the standard assistant without AI Chat. Useful to know if you want one without the other.
To close the assistant in either case, press Esc. Fast open, fast close, no mouse needed.
3. Navigate Between Suggestions
- Tab to move forward, Shift+Tab to go back
Once the Grammarly assistant is open, Tab moves you to the next interactive element, and Shift+Tab moves you back to the previous one.
In practice, this means you can cycle through every suggestion in a document without ever touching the mouse.
If you’re doing X, this matters because a long document with forty or fifty suggestions can take ten minutes to review by mouse.
Tab-cycling cuts that time by a third, because your hand never leaves the keyboard between accept, next, accept, next.
This also works in the Grammarly Editor web app. Press F6 to highlight the first element on the page, then use Tab to move forward or Shift+Tab to go back through the interface.
F6 is the only entry point into keyboard navigation inside the Editor itself.
4. Accept a Suggestion
- Enter Or Space
Once you’ve navigated to a suggestion using Tab, pressing Enter or Space accepts it and applies the fix directly to your text. No click required.
Compared to the mouse workflow, where you move the cursor to the suggestion card and click the specific fix text, this is substantially faster.
In a document with thirty grammar corrections, keyboard acceptance saves somewhere between two and four minutes just from the reduced mouse movement alone.
One thing worth knowing: in Microsoft Word specifically, Grammarly may show a different interface where suggestions appear in a panel rather than on an inline floating card.
In that view, Tab still moves between suggestions and Enter still accepts them, so the shortcut behavior is consistent.
5. Dismiss a Suggestion and Close the Assistant
- Esc
Esc does two things depending on context. If a suggestion card is focused, pressing Esc dismisses it, which is the equivalent of clicking the trash icon on the suggestion.
If the Grammarly assistant panel is open, Esc closes it entirely. Most editors hit Esc instinctively when they want to get out of something.
Grammarly honors that expectation consistently, which is actually less common than you’d expect across writing tools.
The fact that the same key handles both dismissal and closure means there’s no second shortcut to remember for exiting the assistant.
When keyboard mode is active (meaning focus is on the Grammarly assistant), the focus stays on the assistant until you either dismiss it with Esc or use the close button.
So Esc is also how you return focus to your document and resume writing.
Pro Tip
Combine shortcuts 1 through 5 into a review rhythm: open with Shift+Ctrl+Alt+G, hit Tab to reach the first suggestion, press Enter to accept or Esc to dismiss, then Tab again to move to the next.
You never need to lift your hands. For a 1,000-word document with 20 suggestions, this rhythm takes about 90 seconds, compared to 4-5 minutes with a mouse.
6. Trigger Grammarly Snippets Anywhere
- \ (backslash key, while typing in any text field)
This one is buried in Grammarly’s documentation and almost never appears in shortcut guides.
Pressing the backslash key while typing opens your Snippets library, Grammarly’s text-expansion feature for reusable phrases, sentences, and full paragraphs.
When I was onboarding a new team member and writing the same five-paragraph product overview for the third time that week, I set it up as a snippet.
Now I press \, type the first few characters of the snippet name, press Enter, and the entire block inserts instantly. What used to take three minutes now takes four seconds.
Snippets work wherever Grammarly is active, including Gmail, Outlook, Slack, Google Docs, and any browser-based text field. After pressing \, you can browse with the arrow keys or type to search for the snippet by name.
Press Enter to insert it. The backslash shortcut is also customizable: go to Account > Feature Customization, then look for Assign Shortcuts to change it to a character you prefer.
This feature is available on Grammarly Pro and Business plans, not the free tier.
7. Bold, Italic, and Underline in the Grammarly Editor
- Bold: Ctrl+B
- Italic: Ctrl+I
- Underline: Ctrl+U
- Mac: Replace Ctrl with Cmd
Inside the Grammarly Editor, formatting shortcuts work exactly the way they do in Word or Google Docs. Select text, press Ctrl+B to bold it, Ctrl+I to italicize, Ctrl+U to underline. No toolbar hunting required.
One thing that trips up new users: these shortcuts only work when you’re actively inside the Grammarly Editor web app.
If you’re using the floating widget in Gmail or Slack, these standard formatting shortcuts apply to the host application, not to Grammarly.
Grammarly doesn’t override your application’s own formatting behavior, which is actually the right call.
To discover every formatting shortcut inside the Editor, hover over any formatting option in the toolbar. The keyboard shortcut shows up in a tooltip.
Grammarly doesn’t publish a complete public list, so the hover method is the official way to find all of them.
8. Undo and Redo in the Grammarly Editor
- Undo:Ctrl+Z
- Redo: Ctrl+Y
- Mac Undo: Cmd+Z
After accepting a Grammarly suggestion you immediately regret, Ctrl+Z undoes it just like any standard editor.
This is obvious to most people, but what’s less obvious is that it works cleanly in the Grammarly Editor even after bulk changes.
Honestly, the undo history in the Grammarly Editor is more reliable than it appears. I’ve accepted eight or nine suggestions in a row and then hit Ctrl+Z repeatedly to step back through them one by one.
Each accepted suggestion registers as its own undoable action, which means granular rollback works the way you’d want it to.
One limitation worth knowing: undo history doesn’t persist between sessions. If you close the tab and reopen the document, the undo stack is gone.
Accept suggestions carefully if the document is long and complex, since there’s no multi-session safety net here.
9. Navigate the Editor Without a Mouse (F6 Method)
- F6 start keyboard navigation, Shift+F6go to previous element
This one is for the Grammarly Editor specifically, and it’s almost completely unknown. Press F6 to highlight the first interactive element on the page.
Then use F6 to move forward through elements or Shift+F6 to go back. Tab and Shift+Tab navigate within a focused section.
To activate a link or button once focused on it, press Space or Enter. This means you can review a full document, open the suggestions panel, cycle through corrections, and close the panel all without touching a mouse once.
It’s not a flashy workflow, but for long editing sessions, it’s genuinely useful.
Most shortcut guides skip F6 entirely because it’s an accessibility-focused feature rather than a productivity headline.
But it’s the only way to truly navigate the Grammarly Editor interface with only a keyboard, which matters if you’re working on a laptop without a mouse or if you prefer keeping your hands on the keyboard during deep editing.
10. Copy, Paste, and Find in the Grammarly Panel
- Copy: Ctrl+C
- Find in Editor: Ctrl+F
- Mac: Cmd+C / Cmd+F
When the Grammarly panel is focused, Ctrl+C copies the selected text directly from the panel window without first switching back to the original editor.
And Ctrl+F inside the Grammarly Editor triggers a search within the document, which lets you find repeated words or specific phrases quickly.
Compared to similar tools, Grammarly feels underbuilt. There’s no native “find and replace” shortcut in the Grammarly Editor, which becomes noticeable once you’re editing anything over 2,000 words.
For find-and-replace operations, you’ll need to export to Word or use the browser’s built-in Ctrl+H. It’s a gap worth knowing about before you commit to the Editor for long documents.
That said, Ctrl+F within the Editor is still genuinely useful for checking whether you’ve overused a specific word.
Type the word in the search bar and see every instance highlighted in the document at once, then review whether the repetition is intentional.
Common Mistakes When Using Grammarly Shortcuts
- Using the browser extension shortcut inside the desktop app. Shift+Ctrl+Alt+G does nothing in Word or Outlook. You need Shift+Ctrl+G for the desktop app. These are completely separate applications and don’t share shortcut spaces.
- Expecting formatting shortcuts to work outside the Grammarly Editor.
Ctrl+B, Ctrl+I, and Ctrl+U are standard shortcuts that the host application handles. Grammarly doesn’t override them. If bold isn’t working while you’re typing in Gmail, that’s Gmail’s behavior, not Grammarly blocking it. - Forgetting to press F6 first in the Grammarly Editor. Tab does nothing for Grammarly navigation until you’ve pressed F6 to activate keyboard mode in the Editor. A lot of people press Tab, see nothing happen, and assume keyboard navigation doesn’t work. It just needs F6 as the entry point.
- Not setting up Snippets before trying the backslash shortcut. Pressing \ opens your Snippets library, but if you haven’t created any snippets yet, the library shows empty, and nothing happens. Go to your Grammarly account, find the Snippets section under Account or the home page, and create at least one before testing the shortcut.
- Assuming the shortcut combination is universal. The shortcut to open the assistant can conflict with other browser extensions or OS shortcuts. If Shift+Ctrl+Alt+G does nothing, another extension is likely capturing that key combination first. Check your other extensions and disable any that use overlapping shortcut keys, or change Grammarly’s shortcut to something unique in settings.
Workflow Example: Editing a 500-Word Email Using Only Shortcuts
Here’s a realistic walkthrough. You’ve finished drafting a professional email in Gmail and want to check it with Grammarly before sending.
- Press Shift+Ctrl+Alt+G while your cursor is in the Gmail compose window. The Grammarly assistant panel opens on the right side of the text box.
- Press Tab to move focus to the first suggestion. Grammarly highlights the relevant text in your email and shows the suggestion card.
- Press Enter to accept the fix. The correction applies immediately, and the focus automatically moves to the next suggestion.
- Press Tab again to reach the next one. Review it. If it doesn’t apply to your intent, press Esc to dismiss, then Tab to continue.
- Repeat until you’ve reviewed every suggestion. No mouse movement at any point.
- Press Esc to close the assistant panel when done. Focus returns to your email compose window.
- Send. A 500-word email with ten suggestions reviewed in under two minutes, hands never left the keyboard.
So if you write 10 emails a day and each one gets a Grammarly review, this shortcut rhythm saves roughly 30 minutes a day compared to mouse-driven editing. Not dramatic per email, but significant across a week of writing.
Pro Tip
Build a snippet for your email sign-off, introductory pleasantries, or any boilerplate you type more than three times a week.
Press \, type the first two letters of the snippet name, and press Enter. For heavy email writers, snippets alone save more time than any other single Grammarly feature.
Can You Customize Grammarly Keyboard Shortcuts?
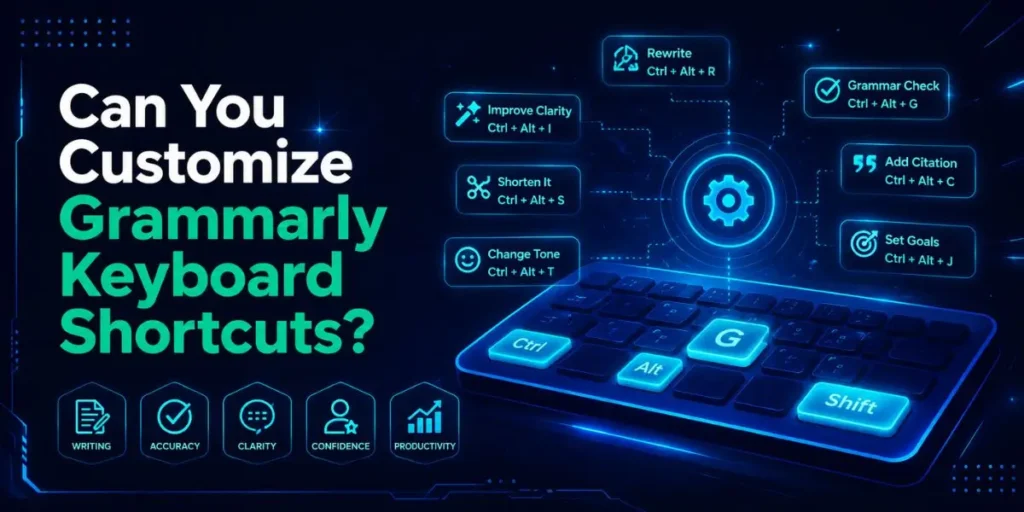
Yes, but only partially. The shortcut to open the assistant is customizable through your Grammarly account settings under Feature Customization.
You can change the default combination to anything that doesn’t conflict with your existing shortcuts.
The snippets trigger key is also customizable. Press \ to open the snippet window, click the three dots next to any snippet, and choose “Edit shortcut” to change the trigger character.
Or go to Account > Feature Customization and look for the Assign Shortcuts section. Pick a character you don’t normally type in your daily writing so it doesn’t trigger unexpectedly.
But navigation shortcuts like Tab, Shift+Tab, Enter, Esc, and F6 are not customizable.
These are hardcoded to standard keyboard navigation principles and follow accessibility conventions, which is why they’re consistent across browsers and operating systems.
Conflict Warning
If Grammarly’s open-assistant shortcut stops working after a browser update or after installing a new extension, check your browser’s shortcut settings first.
Chrome lets you manage extension keyboard shortcuts at chrome://extensions/shortcuts. Look for conflicts and reassign the Grammarly shortcut there if needed.
Frequently Asked Questions
On Windows, press Shift+Ctrl+Alt+G while typing in any text field in Chrome. On Mac, press Shift+Ctrl+Cmd+G. This opens the Grammarly assistant panel without using the mouse.
Open the assistant with the shortcut, press Tab to navigate to the suggestion, then press Enter or Space to accept it. No mouse required. Press Esc to dismiss a suggestion you want to skip.
Yes. Press the backslash key \ while typing in any text field where Grammarly is active. This opens your Snippets library. Search by name, select with arrow keys, and press Enter to insert.
Yes, but you need the Grammarly desktop app installed, not just the browser extension. Use Shift+Ctrl+G on Windows to open the assistant inside Word. The browser extension shortcuts do not work in desktop applications.
The open-assistant shortcut and the snippets trigger key are both customizable through Grammarly’s account settings under Feature Customization. Navigation shortcuts like Tab, Esc, and Enter are not customizable.
Is an SEO Specialist and AI Tools Researcher with over 4 years of hands-on experience in search engine optimization. As the founder of Smart AI Helper Pro, he tests and reviews AI writing, SEO, and marketing tools to help creators and business owners grow faster with practical, research-backed strategies.