
How to Install Grammarly Chrome Extension in 2026 (Step-by-Step Guide)
By SM Mehedi Hasan
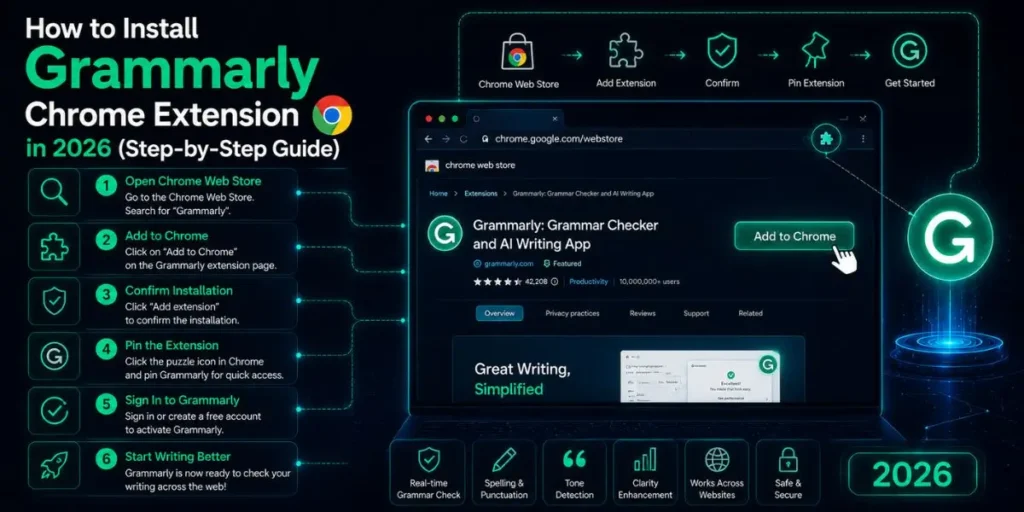
To install the Grammarly Chrome extension in 2026, open Google Chrome, go to the Chrome Web Store, search for “Grammarly,” click Add to Chrome, confirm the permission pop-up, then sign in or create a free account.
The whole process takes under two minutes and works on Windows, Mac, and Chromebook.
If you write anything online, emails, blog posts, social media captions, or Google Docs, Grammarly’s Chrome extension is one of those tools that quietly improves your workflow once it’s running.
Most people assume the setup process is complicated, but actually, it takes less than a couple of minutes from start to finish. There is no separate software download and no long installation wizard to deal with.
You install it directly from the Chrome Web Store, and it starts working immediately across most websites you visit.
Compared to older browser writing tools, Grammarly feels much lighter and easier to manage. The thing is, you barely notice it until it catches a typo or awkward sentence right before you hit send.
So in this guide, I’ll walk you through the exact installation steps, what you should expect after setup, and a few settings worth adjusting right away.
Table Of Contents
ToggleWhat Is the Grammarly Chrome Extension?
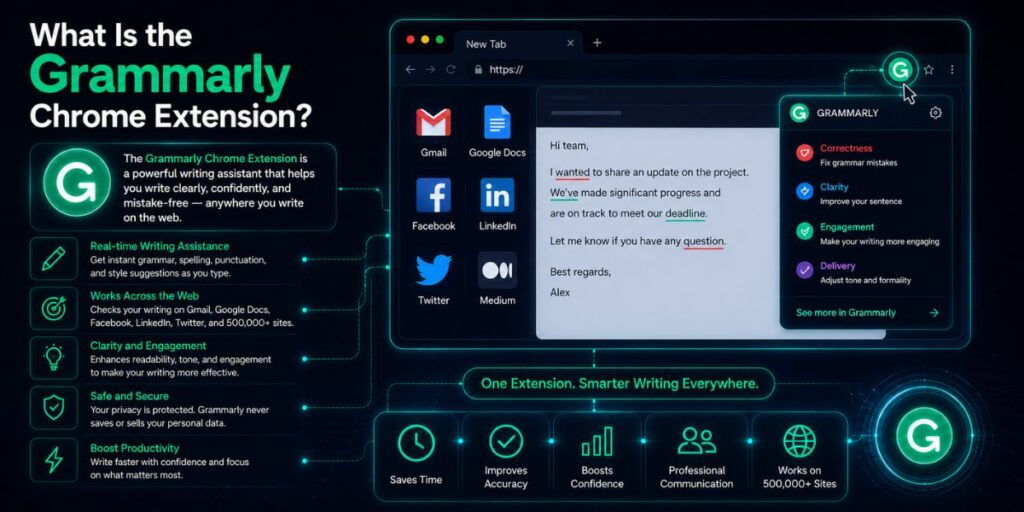
Grammarly for Chrome is a browser extension that checks your grammar, spelling, tone, and clarity in real time wherever you type online.
That includes Gmail, Google Docs, LinkedIn, Twitter/X, WordPress, and pretty much any normal text field you use on the web.
Unlike the standalone Grammarly editor, which opens a separate window to paste your writing, the Chrome extension works directly in your browser.
You keep writing as you normally do, and Grammarly adds suggestions inline as you go. You will usually notice a small green icon appearing in text boxes once the extension becomes active.
What I didn’t expect was how much broader the extension became in 2026. Instead of only grammar corrections, you can now find additional AI-powered features.
To use these, click the green lightbulb that appears next to the Grammarly icon. This opens an area where you can type a prompt or pick suggested prompts tailored to the type of writing you’re doing.
The AI features help generate, rephrase, or improve your text based on your chosen prompt.
How to Install Grammarly Chrome Extension (Step-by-Step)
1. Open Google Chrome
Before installing anything, make sure Chrome is up to date to the latest stable version. Grammarly works best with the latest browser builds, so if Chrome shows an update notification, install that first.
Once Chrome finishes updating, reopen the browser normally. You should now be ready to install extensions without compatibility problems.
2. Go to the Chrome Web Store
Type chrome.google.com/webstore into your address bar and press Enter. You can also open chrome://extensions/ and click the Chrome Web Store link from there.
Most people use the direct Web Store route because it is faster. After the page loads, you should see the extensions homepage with a search bar on the left side.
3. Search for “Grammarly.”
Use the search bar in the upper-left area of the Web Store and type Grammarly. Press Enter to load the results.
Look for the official extension called “Grammarly: Grammar Checker and AI Writing Assistant.” It is usually the first result and includes Grammarly’s green logo along with millions of users.
If you’re installing browser extensions for the first time, this step matters because unofficial copies and outdated versions do occasionally appear online.
4. Click “Add to Chrome.”
Once you open the official Grammarly extension page, click the Add to Chrome button near the top-right corner.
Chrome will immediately open a permissions pop-up explaining what the extension can access. This is completely normal for browser extensions, especially ones that interact with text fields and writing inputs.
5. Confirm the Permissions Popup
Click the Add extension button inside the pop-up window to continue the installation.
So here is what actually happened when I tested this on a fresh Chrome profile: the installation finished in about five to ten seconds, and Grammarly automatically added itself to the browser without requiring a restart.
During this step, keep the browser window open until Chrome finishes processing the extension.
6.Sign In or Create a Free Account
After installation, Grammarly will prompt you to sign in before the extension works properly.
If you do not already have an account, you can create one using your email address, Google account, or Apple account.
The free version already includes basic grammar and spelling checks, and honestly, that is enough for many everyday tasks like emails, assignments, and casual writing.
Once you finish signing in, Grammarly typically opens a welcome page that explains the basic features and the browser permissions it requires.
7. Pin Grammarly to Your Chrome Toolbar
Click the small puzzle-piece icon in Chrome’s upper-right toolbar area. Find Grammarly in the extensions list, then click the pin icon next to it.
This keeps Grammarly visible in your toolbar at all times. Plus, it makes it much easier to access settings, temporarily disable the extension, or check whether Grammarly is active on the current website.
Pro Tip
After pinning the extension, open Grammarly’s settings immediately and choose your preferred English dialect, such as US, UK, Canadian, or Australian English. Grammarly changes certain spelling suggestions based on this setting.
For example, it may suggest “organize” in American English but “organize” in British English. Setting this correctly early saves a lot of unnecessary corrections later.
How to Verify the Extension Is Working
The easiest way to test Grammarly is to open Gmail or another website with a text box and start typing normally. If the extension is active, you should see a small green G icon appear near the bottom-right corner of the writing area.
If the icon does not appear, check two things first. Go to chrome://extensions/ and confirm Grammarly is enabled. Then look at the top-right area of your browser to make sure the Grammarly toolbar icon is visible there as well.
One thing that surprises many people is how Grammarly behaves when the desktop app is installed.
If you already use Grammarly on Windows or Mac, the Chrome extension may automatically disable itself on most websites while remaining active in Google Docs.
That behavior is intentional, so it is not usually a bug or installation problem.
In My Experience
What I noticed after setting it up
Honestly, when I first tried Grammarly years ago, I expected it to feel bloated and distracting, kind of like the old browser toolbars people used back in the 2000s. But actually, the experience was much cleaner than I expected.
The green icon stays mostly out of the way, and the suggestions appear as subtle underlines you can either accept or ignore without interrupting your writing flow.
One thing that caught me off guard was how smoothly Grammarly handled Google Docs. Most grammar tools struggle inside Docs because of the way Google’s editor works, but Grammarly adapted surprisingly well.
The sidebar appears on the right side of the document, and you can move through suggestions without constantly switching tabs or copying text elsewhere.
I ran into an issue when testing Grammarly inside a few custom web apps and enterprise dashboards. Some rich text editors simply do not cooperate well with browser extensions.
PDFs opened directly in Chrome can also be inconsistent. So if you’re working inside a custom CMS or an unusual editor, there is a chance Grammarly may not activate there.
Compared to older versions I’ve used, the current Chrome extension feels far more reliable. Earlier releases sometimes missed obvious errors unless you manually pasted text into Grammarly’s website editor.
Now, the gap between the browser extension and the full web editor is much smaller.
Free vs. Premium: What Do You Actually Get?
| Feature | Free Plan | Premium Plan |
|---|---|---|
| Grammar & Spelling | ✅ Yes | ✅ Yes |
| Punctuation Checks | ✅ Yes | ✅ Yes |
| Tone Detection | Limited | ✅ Full |
| Clarity & Readability | ❌ No | ✅ Yes |
| Plagiarism Detection | ❌ No | ✅ Yes |
| Generative AI Writing | Limited prompts | ✅ Full access |
| Style Suggestions | ❌ No | ✅ Yes |
For most casual users, the free plan is already enough to get started. If you’re mainly writing emails, social posts, assignments, or basic blog drafts, you will still get useful spelling and grammar corrections without paying anything.
The premium version becomes more useful when your writing needs become more advanced.
For example, long-form articles, client communication, professional reports, or tone-sensitive writing benefit more from the clarity suggestions, style improvements, and AI rewriting tools.
Which Browsers Does Grammarly Support?
Grammarly currently offers browser extensions for Chrome, Safari, Firefox, and Microsoft Edge. If you’re already using Chrome, you’re getting the smoothest and most fully supported experience right now.
Most people assume the extension behaves exactly the same across all browsers, but in fact, there are a few differences. Safari, for example, keeps Grammarly disabled by default on websites until you manually enable it.
Chrome is simpler in that regard because extensions usually start working immediately after installation.
Compared to smaller Chromium-based browsers, Chrome and Edge tend to receive updates and compatibility fixes faster.
So if reliability matters to you, sticking with officially supported browsers usually saves time and frustration later.
This works fairly well on Brave, too, except when browser-specific privacy protections interfere with extensions. Since Brave is based on Chromium, many users install the Chrome extension manually without issues.
Still, official Grammarly support for Brave and Opera is limited, so occasional bugs or missing features are possible.
Common Mistakes People Make During Installation
Installing from unofficial sources
If you’re installing Grammarly for the first time, this matters more than most people realize. Third-party Grammarly downloads are available online, but some are outdated, while others are completely fake.
Always install Grammarly directly from the official Chrome Web Store. That way, you know you’re getting the legitimate extension with current updates and security protections.
Skipping the account setup
One thing that confuses new users is that Grammarly can appear installed before the setup process is actually complete.
The extension itself installs immediately, but Grammarly will not start checking your writing until you sign in to an account. A lot of people close the welcome screen too early, then wonder why no suggestions appear later.
Not pinning the extension.
Honestly, this is one of the easiest mistakes to make.
If you do not pin Grammarly to your Chrome toolbar, the icon stays hidden inside the puzzle-piece extensions menu.
That means every time you want to open settings or quickly disable Grammarly on a website, you have to dig through menus first.
Pinning it takes a few seconds and makes the extension much easier to manage day to day.
Leaving the language setting on the default
Compared to casual users, professional writers usually notice this issue very quickly.
If your Grammarly settings are locked to American English while you normally write in British English, Grammarly may flag perfectly correct spellings like “organize” or “color” as mistakes.
After installation, go to settings and choose the correct English dialect right away.
Expecting it to work everywhere
This is probably the biggest misunderstanding people have about Grammarly browser extensions.
Some websites simply do not support browser-based writing tools properly. Password-protected dashboards, PDFs opened in Chrome, and certain custom web apps may block Grammarly completely.
That is usually a browser limitation rather than a Grammarly bug.
If you’re working regularly in one of those environments, the Grammarly web editor is often the better fallback option.
Heads Up
If you’re using a company-managed Chrome profile, your IT administrator may have disabled third-party browser extensions entirely. When that happens, the Add to Chrome button can appear greyed out or disappear completely.
In most cases, you will need your IT department to manually approve or whitelist Grammarly before installation works.
How to Set Up Grammarly After Installation

Installation only gets the extension running. The thing is, a few quick settings changes can make Grammarly feel much more accurate and less distracting during everyday writing.
Set Your Writing Goals
When you open Grammarly or click the extension icon while writing, you’ll see a section called Goals.
Here, you can choose your audience type, writing intent, and tone. For example, you might select:
- General or expert audience
- Inform, describe, or convince
- Formal or informal tone
Grammarly uses these settings to adjust its suggestions. So instead of getting generic edits, you get recommendations that better match the type of writing you’re actually doing.
Configure Which Sites Grammarly Is Active On
Click the Grammarly icon in your Chrome toolbar to manage where the extension works.
You will see a toggle that lets you enable or disable Grammarly for the current website.
This becomes useful when certain rich text editors conflict with browser extensions or when Grammarly becomes distracting inside specific apps.
What I didn’t expect was how often I used this feature while testing different CMS platforms. Some editors behave perfectly with Grammarly, while others become noticeably slower.
Disabling Grammarly for just one website keeps the rest of your browsing experience unaffected.
Connect to Grammarly’s AI Features
To use Grammarly’s AI tools, click the green lightbulb icon near the Grammarly suggestion panel.
You can type your own prompt or select from Grammarly’s suggested prompts based on your writing context. This is especially useful for things like:
- Rewriting awkward paragraphs
- Creating email subject lines
- Drafting replies faster
- Shortening long sentences
The AI features feel much more integrated now compared to older versions, where they felt separate from the normal editing experience.
Pro Tip
Try getting into the habit of checking Grammarly’s suggestion panel before sending emails or publishing anything important. On most systems, clicking the Grammarly card beside a text box opens the full review panel instantly.
It only takes a few extra seconds, but it catches a surprising number of small mistakes.
Workflow Example: Writing a Professional Email with Grammarly
Here is what a normal workflow actually looks like after the extension is fully installed and configured.
- Open Gmail in Chrome and click Compose. You should immediately see the green Grammarly icon appear near the bottom-right corner of the email window.
- Write your email normally first. Do not stop to fix every mistake immediately.
- As you type, Grammarly adds red and yellow underlines. Red usually points to grammar or spelling issues, while yellow suggestions focus more on tone, clarity, or style.
- Hover over any underlined text to preview Grammarly’s suggestion. If you agree with the correction, click it to apply the change. If not, dismiss it with the X button.
- Check the Grammarly toolbar icon occasionally. It shows a writing score between 0 and 100. For professional emails, aiming above 90 is usually a good target.
- If you want help rewriting a paragraph or brainstorming a better subject line, click the AI lightbulb and enter a prompt.
- Send the email once everything looks clean.
When I tested this workflow in Gmail, the full review process usually added less than a minute to the writing time.
But honestly, that extra 30 to 60 seconds is often worth it to catch awkward phrasing or embarrassing typos before the message goes out.
Does Grammarly Work on Google Docs?
Yes, and honestly, this is one of the most useful parts of the Chrome extension.
Grammarly integrates directly with Google Docs and displays a dedicated suggestions panel on the right side of the document.
You do not need to copy text into another editor or switch between browser tabs while writing.
One thing that surprised me most was how stable the integration became compared to older versions. Earlier Grammarly releases struggled badly in Google Docs because Google’s editor handles text rendering poorly.
Now, the sidebar and inline suggestions work much more smoothly. There is one important detail worth knowing, though.
If you also install the Grammarly desktop app for Windows or Mac, the Chrome extension may automatically disable itself on most websites while remaining active inside Google Docs.
The first time I encountered this, I genuinely thought something had broken.
So if most of your writing happens inside Google Docs anyway, the Chrome extension by itself is usually enough.
Pro Tip
Long Google Docs files can occasionally slow Grammarly down, especially those over 10,000 words.
If the sidebar starts lagging or suggestions stop loading properly, refresh the page once. In most cases, Grammarly reloads normally after that.
Frequently Asked Questions
Yes. Grammarly’s basic plan is completely free and includes grammar, spelling, and punctuation corrections. Premium features like clarity rewrites, plagiarism detection, advanced tone suggestions, and AI tools require a paid subscription.
No. Grammarly processes your writing through its servers, so the extension requires an active internet connection to function properly. Even if the extension is already installed, offline editing will not work.
Right-click the Grammarly icon in your Chrome toolbar and select Remove from Chrome. You can also open chrome://extensions/, find Grammarly, and click Remove there.
Removing the extension does not delete your Grammarly account or saved information.
Most of the time, the extension is either disabled or simply not pinned to the toolbar.
Open chrome://extensions/ and make sure Grammarly is toggled on. Then click the puzzle-piece icon in Chrome’s toolbar area and pin Grammarly so the icon stays visible.
Yes, but each Chrome profile can connect to only one Grammarly account at a time.
If you use separate Chrome profiles for personal and work use, you can install Grammarly separately inside each profile and sign into different accounts independently.

Is an SEO Specialist and AI Tools Researcher with over 4 years of hands-on experience in search engine optimization. As the founder of Smart AI Helper Pro, he tests and reviews AI writing, SEO, and marketing tools to help creators and business owners grow faster with practical, research-backed strategies.