
How to Download Grammarly for WindowsFull Guide 2026
By SM Mehedi Hasan
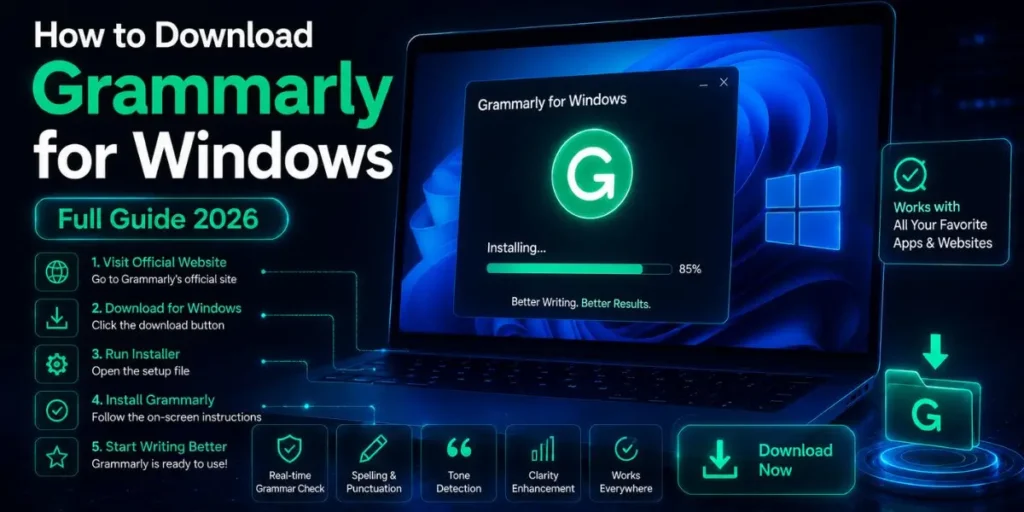
To download Grammarly for Windows in 2026, go to grammarly.com/desktop/windows, click the download button, run the installer file, and sign in to your account.
The floating widget or side tab will then appear automatically in every app you type in – including Word, Outlook, Chrome, Slack, and more. Takes under 3 minutes.
Most people install Grammarly, thinking it’s only for browsers. That’s a common mistake.
The Windows desktop app is actually the more powerful version – it works system-wide, meaning it shows up in Microsoft Word, Outlook, Slack, Notepad, and basically any text field on your PC without needing a browser open.
This guide covers everything: how to download it, what to expect during setup, how to use it in Word and Outlook, the new AI tab feature, and what to do when things don’t work as expected.
If you follow this step-by-step, you’ll have it running correctly by the time you finish reading.
Table Of Contents
ToggleBefore You Download: System Requirements for Grammarly on Windows
Checking this before installation saves a lot of frustration later. Grammarly for Windows has specific requirements – and if your machine doesn’t meet them, the installer will either fail silently or install but not work properly.
| Requirement | Minimum | Notes |
|---|---|---|
| Operating System | Windows 10 (build 1903) or newer | Windows 11 fully supported |
| Browser (for web features) | Google Chrome 89+ or Microsoft Edge 89+ | Required even if you mainly use the desktop app |
| Microsoft Office (optional) | Office 2016 or newer | Needed for Word/Outlook integration |
| Internet Connection | Required at all times | Grammarly processes text on its servers |
| Disk Space | ~200 MB free | Installer is small; app runs light |
Important Note: Windows 7 and Windows 8 are not supported. If you’re still on those versions, you’ll need to use the Grammarly browser extension or the web-based Grammarly Editor instead.
The desktop app simply won’t install correctly on those older systems.
How to Download Grammarly for Windows: Step-by-Step
1. Go to the Official Grammarly Download Page
Open your browser and go to grammarly.com/desktop/windows. This is the official page – avoid downloading from third-party sites like Softonic, FileHorse, or any random download portal.
Some of those hosts have outdated versions, and a few have bundled software you don’t want.
2. Click the Download Button
You’ll see a clear ‘Download’ button on the page. Click it. The installer file – typically named something like GrammarlyInstaller.exe – will begin downloading to your default Downloads folder.
It’s a small file, usually under 5 MB, so it downloads fast.
3. Run the Installer File
Open your Downloads folder and double-click the installer file. Windows may show a User Account Control (UAC) prompt asking if you want to allow the app to make changes to your device – click ‘Yes.’
The installation runs mostly in the background. You don’t need to select folders or click through multiple pages. It just installs.
4. Wait for Installation to Complete
The installer runs automatically and takes about 30-60 seconds. Don’t close any windows during this step.
Once done, Grammarly will appear in your system tray – that’s the row of small icons in the bottom-right corner of your taskbar, near the clock.
5. Sign In to Your Grammarly Account
A login window will open automatically. Sign in with your existing account, or create a free one using your email, Google, or Apple account.
You must be signed in for suggestions to appear – the app won’t do anything without an active login.
6. Open Any App and Start Typing
Once you’re signed in, open any application – Word, Notepad, Slack, Chrome, your email client – and start typing. You should see the floating Grammarly widget or the side tab appear automatically on your screen. That means it’s working.
Pro Tip: You can also download Grammarly for Windows directly from the Microsoft Store. Search ‘Grammarly’ in the Store app and install it from there.
This method is useful on work or school PCs where the standard .exe installer might be blocked by IT policy – the Store version often bypasses those restrictions since it’s treated as a trusted app source.
What Happens After Installation - The Widget and Side Tab Explained
Most competitors’ guides end at ‘installation complete’ and move on. But that’s exactly where new users get confused. Here’s what you’ll actually see after installing Grammarly.
Grammarly for Windows offers two interface options. The first is the floating Grammarly widget – a small green icon that appears next to whichever text field you’re actively typing in.
When Grammarly detects a writing issue, it underlines the problematic word and shows the number of identified issues on the widget itself. Click it to see suggestions.
The second option is the Grammarly tab, which sits on the right edge of your screen and offers AI chat functionality.
This tab lets you interact directly with Grammarly’s AI for writing help, suggestions, and responses – right inside your app.
To switch from the widget to the tab, find the Grammarly icon in your system tray (bottom-right), right-click it, go to Settings, and toggle the AI Chat/tab option on.
Worth Knowing: The Grammarly tab with AI Chat only becomes available after you enable generative AI features for your account.
In the Feature Customization panel in your Grammarly settings, turn on AI Chat to unlock the tab. If you don’t see the tab in Settings, it’s likely because this feature is still disabled in your account.
In Microsoft Word specifically, Grammarly shows a different interface – a list of suggestions in a panel, not the floating widget.
This lets you review suggestions for the next 10 pages based on your cursor position, which is much more practical for long documents.
How to Use Grammarly in Microsoft Word and Outlook
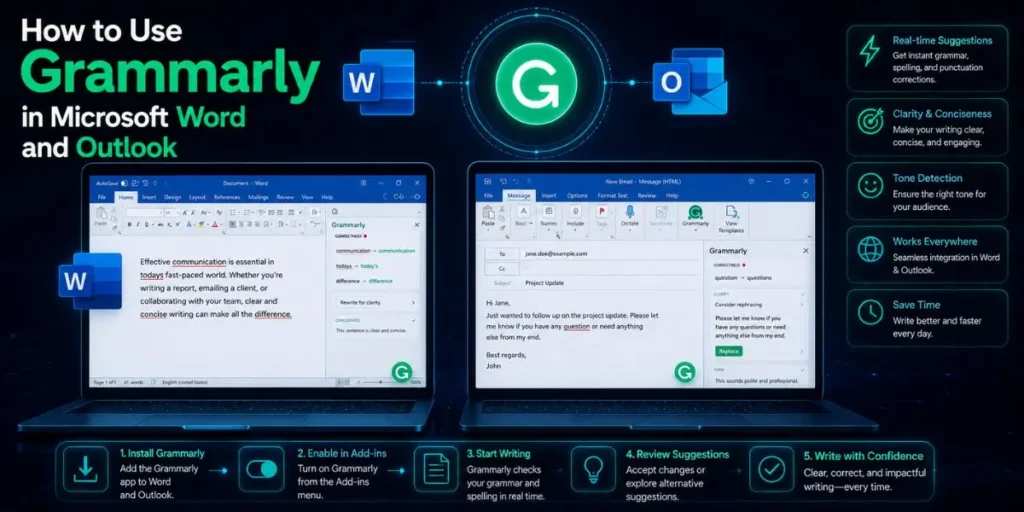
This is the part most guides skip entirely – and it’s one of the main reasons people download the desktop app in the first place.
When you install Grammarly for Windows, it automatically integrates with Microsoft Office. No extra steps needed. Open Word or Outlook and start typing – Grammarly’s suggestions should appear in the interface.
In Outlook, PowerPoint, OneNote, and Excel, suggestions appear one by one on a draggable widget you can move around the screen.
Heads Up: Grammarly doesn’t work in Microsoft Word when the Outline, Draft, or Web Layout view is selected.
If you’re in one of those views and don’t see any suggestions, switch to Print Layout (View > Print Layout), and the Grammarly panel will reappear. This trips up a lot of people.
Also, if you open two Word documents simultaneously, Grammarly will only activate in one of them. It’s not a bug, just a known limitation. Close one document and reopen it separately if you need Grammarly running in both.
Pro Tip: If Grammarly isn’t showing up in Word after installation, go to your Word menu, click View, and make sure you’re in Print Layout.
Then check your system tray – if the Grammarly icon is there, right-click it and confirm it’s not turned off for Word specifically. Nine times out of ten, this fixes it.
In My Experience: What I Didn't Expect from the Windows Desktop Version
What I didn’t expect was how different the desktop app feels compared to the browser extension.
When I first switched from the Chrome extension to the desktop version, I assumed it would be basically the same thing – just running in more places. It’s not. The desktop app’s system-wide presence is genuinely useful.
I was writing a long Slack message to a client – the kind you draft carefully – and noticed Grammarly flagging a passive-voice issue and a comma splice I’d completely missed.
Without the desktop app, Slack wouldn’t have had any Grammarly coverage at all, since I wasn’t using Chrome at that moment.
The frustration? It doesn’t work in every app. Some text editors that use custom rendering engines – such as certain code-adjacent tools, older enterprise platforms, and PDF forms – simply don’t display the widget.
Grammarly is upfront about this, but it’s still a bit jarring when you expect coverage and get nothing.
One thing that caught me off guard: if you have both the browser extension and the desktop app installed, the extension gets disabled everywhere – except in Google Docs, where it stays active.
So your Google Docs coverage actually comes from the extension, not the desktop app, even when both are installed. Knowing this avoids a confusing troubleshooting loop.
Grammarly for Windows vs. Browser Extension - Which Should You Use?
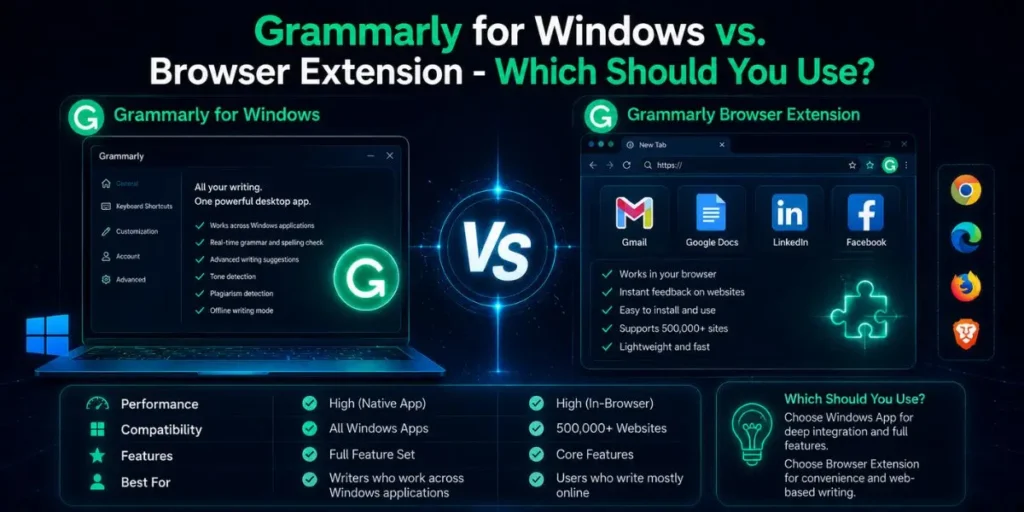
Most people don’t realize these are two completely separate products that work differently. Here’s the honest comparison.
| Feature | Desktop App (Windows) | Chrome Extension |
|---|---|---|
| Works in Microsoft Word | Yes | No |
| Works in Outlook (desktop) | Yes | No |
| Works in Slack (desktop) | Yes | No |
| Works in Gmail (browser) | Yes | Yes |
| Works in Google Docs | Via Extension only | Yes |
| Works offline | No | No |
| AI Chat Side Tab | Yes (new in 2025-26) | Lightbulb AI |
| Requires installation | Yes (.exe or Store) | No (2-click from Web Store) |
So if you mainly write in a browser – Gmail, Google Docs, WordPress – the Chrome extension is probably enough.
But if any of your workflows involve desktop apps like Word, Outlook, or Slack, the Windows app is the better install. And honestly, installing both and letting them handle their respective environments is the cleanest approach.
Common Installation Problems and How to Fix Them
Beginners run into the same handful of issues, and most of them have simple fixes.
The floating widget doesn’t appear after installation.
Check your system tray first – if the Grammarly icon is there and green, the app is running. If it’s grey or missing, right-click and choose ‘Start Grammarly.’
If you still don’t see the widget while typing, the app may be disabled for that specific app. Right-click the widget (or system tray icon) and toggle it on for the current application.
Grammarly installs but shows no suggestions.
This almost always means you’re not signed in, or your account session has expired. Click the Grammarly system tray icon and check if a login prompt appears. Re-signing in almost always resolves this.
The installer file won’t run or gets blocked.
Windows Defender or your antivirus might be blocking the file. Temporarily pause your antivirus, run the installer, then re-enable it.
Alternatively, download from the Microsoft Store instead – that version is signed and trusted by Windows by default.
Grammarly is not working in Microsoft Word.
Check that you’re in Print Layout view (not Outline, Draft, or Web Layout). Also, confirm you have Office 2016 or newer – older versions aren’t compatible.
If it still doesn’t show up, try signing out of Grammarly and back in, then restarting Word.
‘We can’t reach Grammarly right now’ error.
This is a connection issue. Grammarly needs an active internet connection at all times since it processes text server-side.
Check your connection, and if you’re on a corporate or school network, confirm that Grammarly’s servers aren’t blocked by your firewall.
The Grammarly tab (AI side panel) isn’t appearing.
The tab only shows up when generative AI features are enabled in your account settings. Go to your Grammarly account, then Settings, then Feature Customization, and make sure the AI assistance toggle is on.
Then right-click the system tray icon and confirm the tab isn’t disabled from Settings.
Workflow Example: Writing a Professional Report with Grammarly for Windows
Here’s what using Grammarly for Windows actually looks like during a realistic writing task.
- Open Microsoft Word on your Windows PC. Grammarly activates automatically – you’ll see the suggestion panel appear on the right side of the document within a few seconds of opening it.
- Write your content normally. Don’t stop to fix errors as you go. Grammarly underlines issues in real time – red for grammar/spelling, blue for style – but you can ignore them until the draft is done.
- Review the suggestion count. After finishing your draft, glance at the Grammarly panel. It’ll show the total number of suggestions grouped by type (correctness, clarity, engagement, delivery).
- Work through the suggestions top to bottom. Click each underlined issue to see Grammarly’s proposed fix. Click once to accept, or dismiss it if your original phrasing was intentional.
- Use the AI tab for rewrites. For any paragraph that feels flat or overly complex, switch to the Grammarly side tab, type a prompt like ‘Make this clearer and more concise,’ and review the three alternative versions it generates.
- Check your overall score. The Grammarly panel shows a writing score (0-100). For professional documents, aim for 85+. A score below 70 usually indicates clarity or structure issues worth addressing.
- Save and send. Clean document, fewer errors, faster review.
Free vs. Pro: What Do You Get with Each Plan?
| Feature | Free | Pro (Paid) |
|---|---|---|
| Grammar & Spelling Fixes | Full | Full |
| Punctuation Checks | Full | Full |
| Clarity & Conciseness | No | Yes |
| Tone Detector | Limited | Full |
| Generative AI Rewrites | Limited daily prompts | Full (up to 1,000/day) |
| Plagiarism Detection | No | Yes |
| Style & Vocabulary Suggestions | No | Yes |
| Multilingual Support | No | Spanish, French, Italian, German, Portuguese |
| Authorship Tracking (AI text) | No | Yes |
For general everyday writing – emails, quick reports, social posts – the free plan is genuinely capable.
It’s not crippled. But if you write long-form content professionally, or need to verify originality, the Pro plan covers gaps the free tier simply doesn’t address.
Pro Tip: Grammarly Pro now supports suggestions in five languages beyond English: Spanish, French, Italian, German, and Portuguese. This is a 2025-26 addition that most comparison articles still miss.
If you regularly write in any of those languages, Pro becomes a much stronger value proposition than it used to be.
Frequently Asked Questions
Yes. The desktop app itself is free to download and install. The free plan covers grammar, spelling, and punctuation with no time limit. Advanced features like clarity rewrites and plagiarism detection require a paid Pro subscription.
Yes. The desktop app works system-wide – in Word, Outlook, Slack, Notepad, and other desktop apps – without a browser being open. However, it requires an active internet connection because Grammarly processes text on its servers.
Go to Settings, then Apps, then Installed Apps, search for Grammarly, and click Uninstall. Alternatively, right-click the Grammarly icon in the system tray and select Uninstall or Exit. Your account and saved data are not affected.
Yes, both are fully supported. Windows 10 requires build 1903 or newer. Windows 11 works without any additional configuration. Windows 7 and 8 are not supported – use the browser extension or Grammarly Editor instead.
Usually, Grammarly is disabled for that specific app, or the app isn’t compatible with Grammarly. Right-click the Grammarly system tray icon, check the settings, and make sure it’s toggled on for your current application. Re-signing in also resolves most cases.
Is an SEO Specialist and AI Tools Researcher with over 4 years of hands-on experience in search engine optimization. As the founder of Smart AI Helper Pro, he tests and reviews AI writing, SEO, and marketing tools to help creators and business owners grow faster with practical, research-backed strategies.